
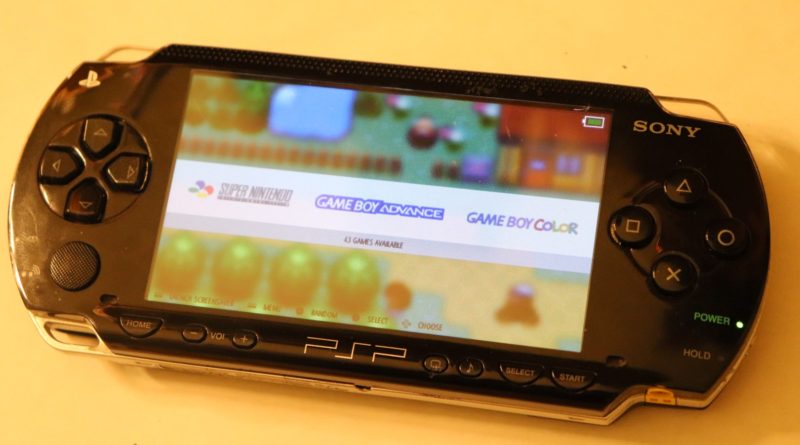
PSPi 1000 Version 4 – Updated December 9, 2021
I recently rewrote the driver for this board, and it is now compatible with the newest version of RetroPie (v4.7.1). The driver is written in C, and should be more compatible with updates going forward. The driver is open source and found on GitHub.
The board now also works with the new Raspberry Pi Zero 2 W. If you want to swap from the original Pi Zero to the Pi Zero 2, check out this video:
Headphone Add-in Board Available Now

This includes an audio filter and amplifier similar to what’s already on the board, and a few more tweaks to make the headphones sound a little better. When headphones are plugged in, the PSP’s internal speakers will be disabled automatically, and will re-enable when the headphones are removed.
The board also includes a connector that allows the microSD to be relocated to the left side of the case. This connector needs to be hand-soldered, and I enlarged the pads to make the process easier.
You can purchase the Headphone board here
Features in Version 4
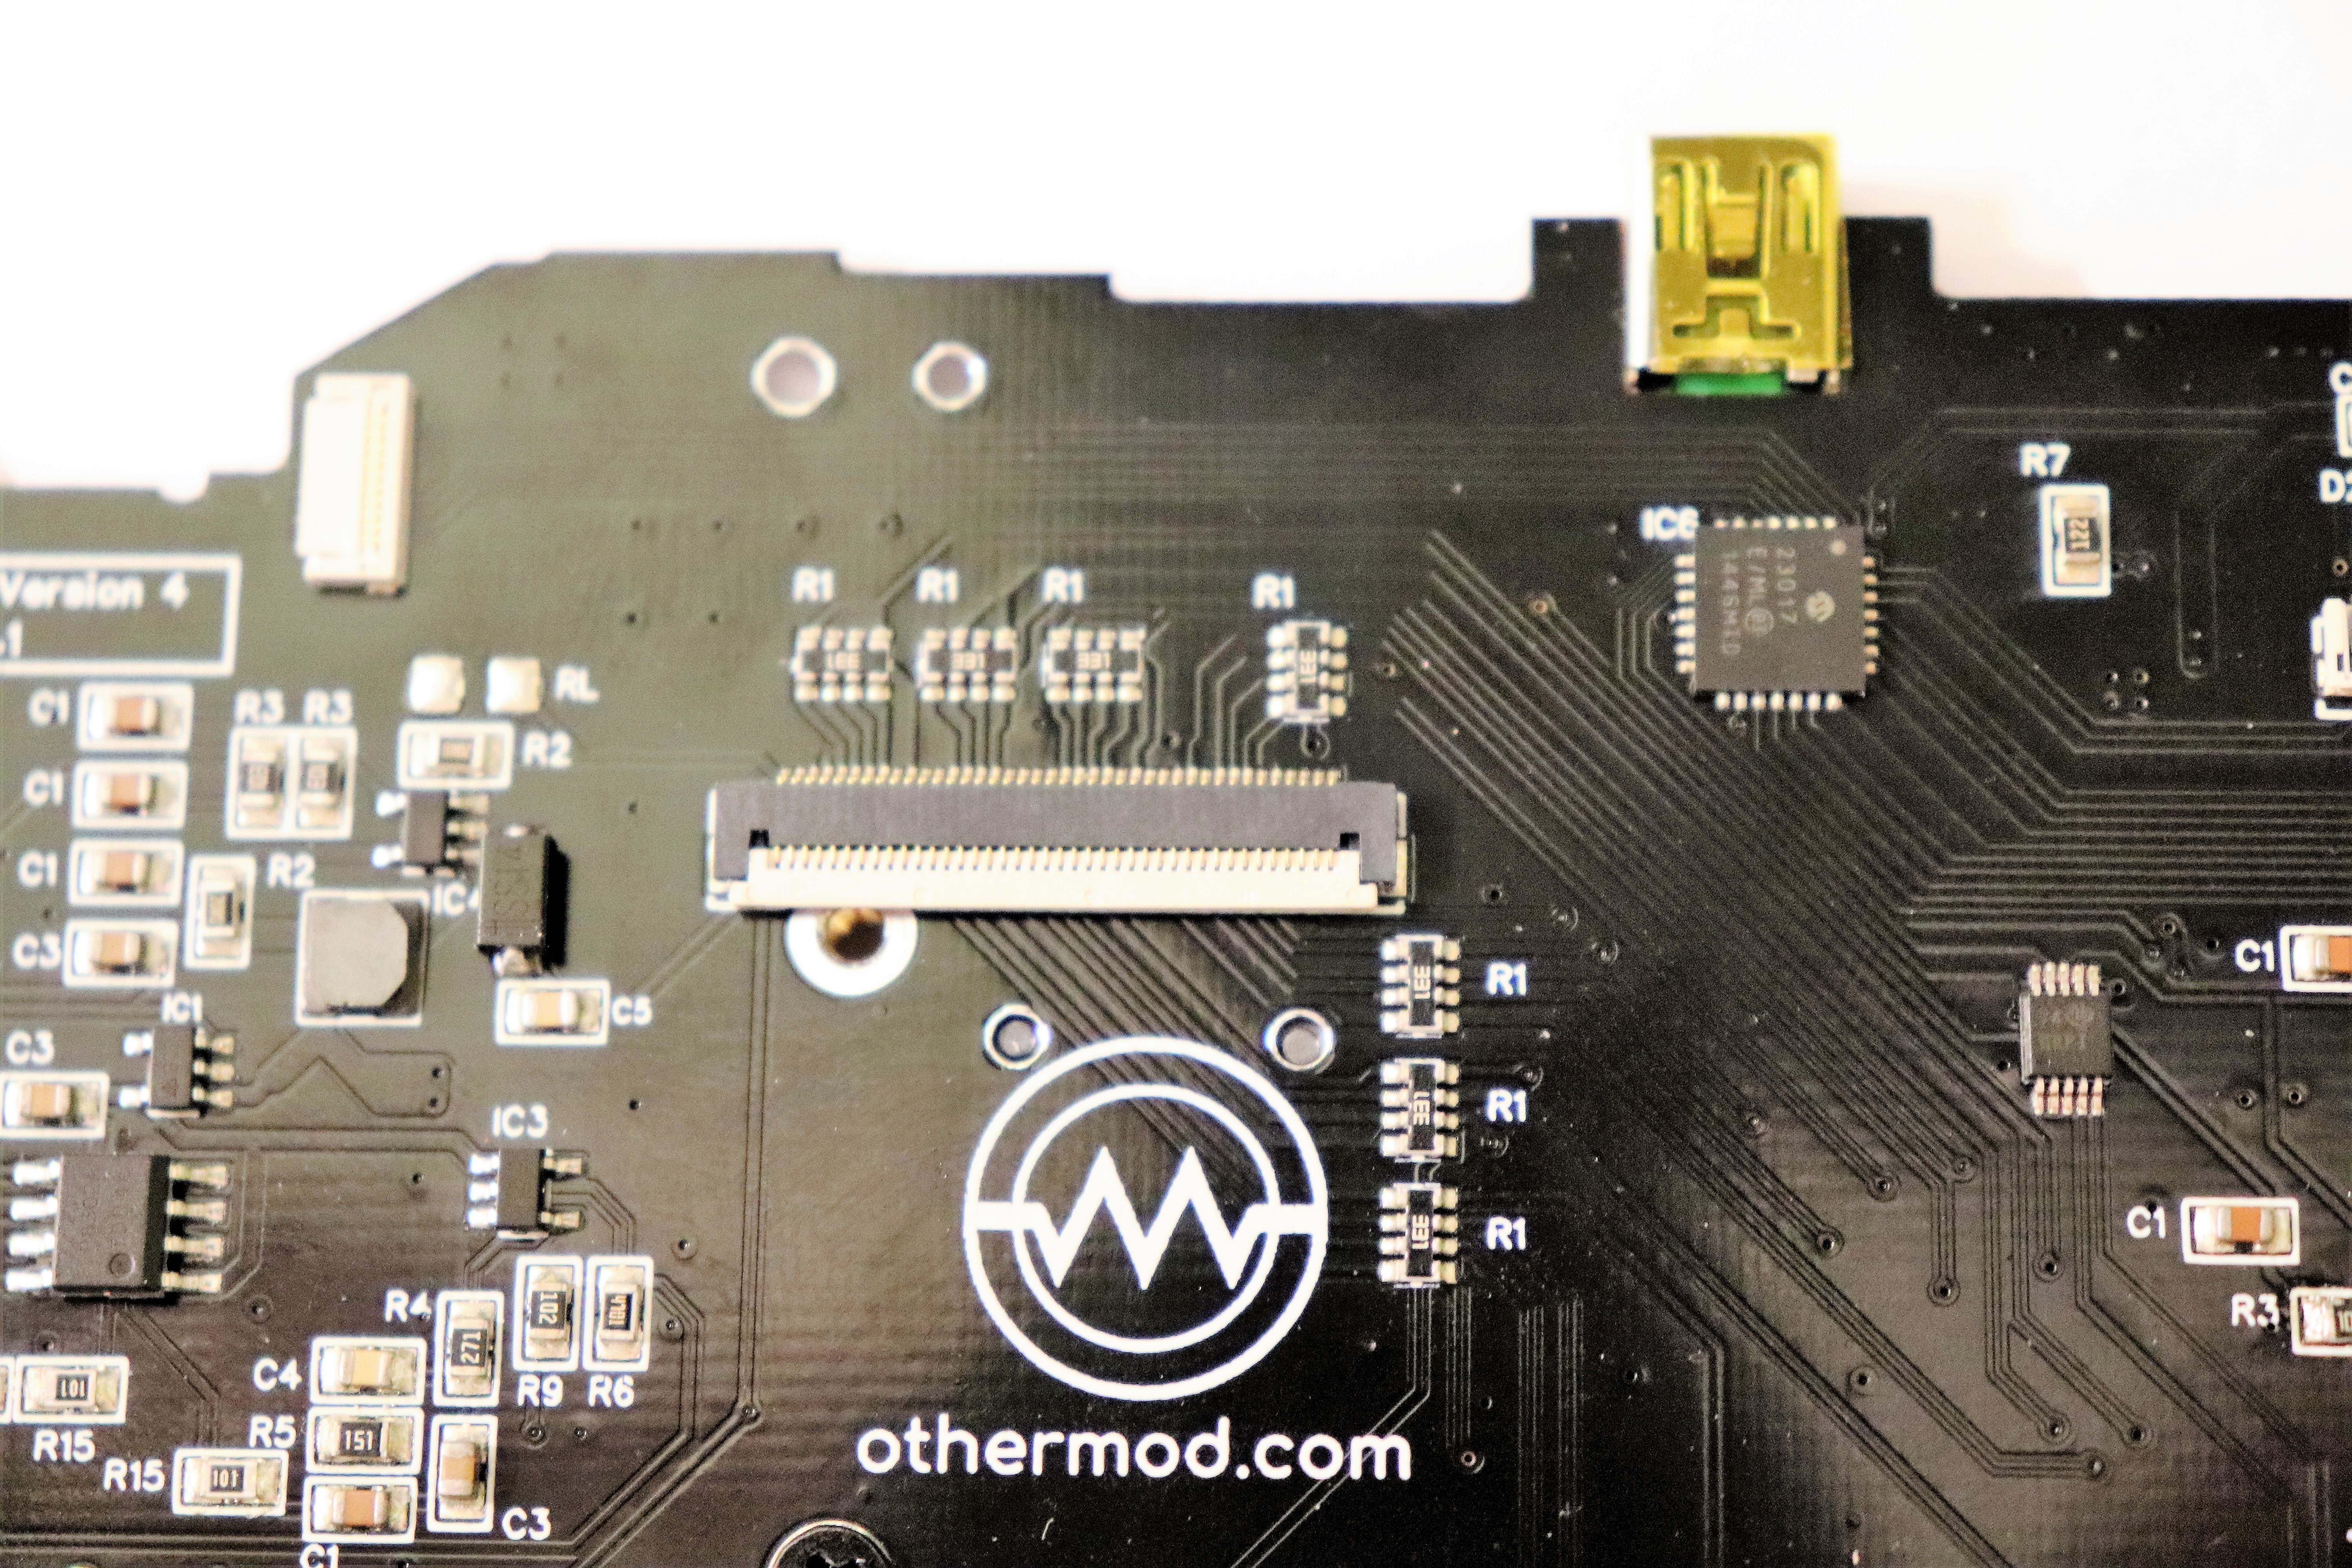
LCD Driven Using GPIO
All LCD control is integrated into the all-in-one, meaning no external controller is needed. The new LCD connects directly to the FPC-40 connector on the board.
The backlight can be dimmed using the Display button on the PSP. Backlight dimming allows for substantial reduction in power consumption and increased play time.
The GPIO-driven display gives a much clearer and brighter image than the composite LCD in previous builds.
The LCD Runs at the same 480 x 272 resolution as the original PSP
Improved Battery Attachment and Management
A JST-PH connector is now included and soldered to the board, and makes connecting the battery much simpler and safer. The board has clear labels for battery polarity, since Chinese batteries sometimes have reversed pins on the JST connector. DO NOT attach a battery backwards!
Play while you charge. The power consumption of the system is typically under half an amp (as low as 1/8 amp when the LCD is dimmed), and the charging rate is 1 amp, so you’re able to play while the PSPi is plugged in and charging.
The charging circuit works with 3.7v lithium/lipo batteries only.

Improved Battery Monitoring and Indicator
Battery voltage is monitored using a 12-bit analog-digital converter. This voltage is constantly averaged and reported using an indicator at the top-right of the LCD. This indicator remains on the LCD at all times. The indicator also shows the charging status when the battery is charging.

Improved joystick
The joystick no longer needs to be soldered. Gold-plated pads make use of the attachment method of the original PSP. The pads are thicker than the ones on the original PSP’s motherboard, making the connection more reliable and drift less likely to occur.
True analog input. The joystick input is the same 12-bit analog-digital converter that monitors the battery, and gives the full range of motion in games that support it.
Can also be used as a mouse. I won’t be supplying the code for this (at least initially), but the capability is there.
Simpler Attachment of the Raspberry Pi Zero
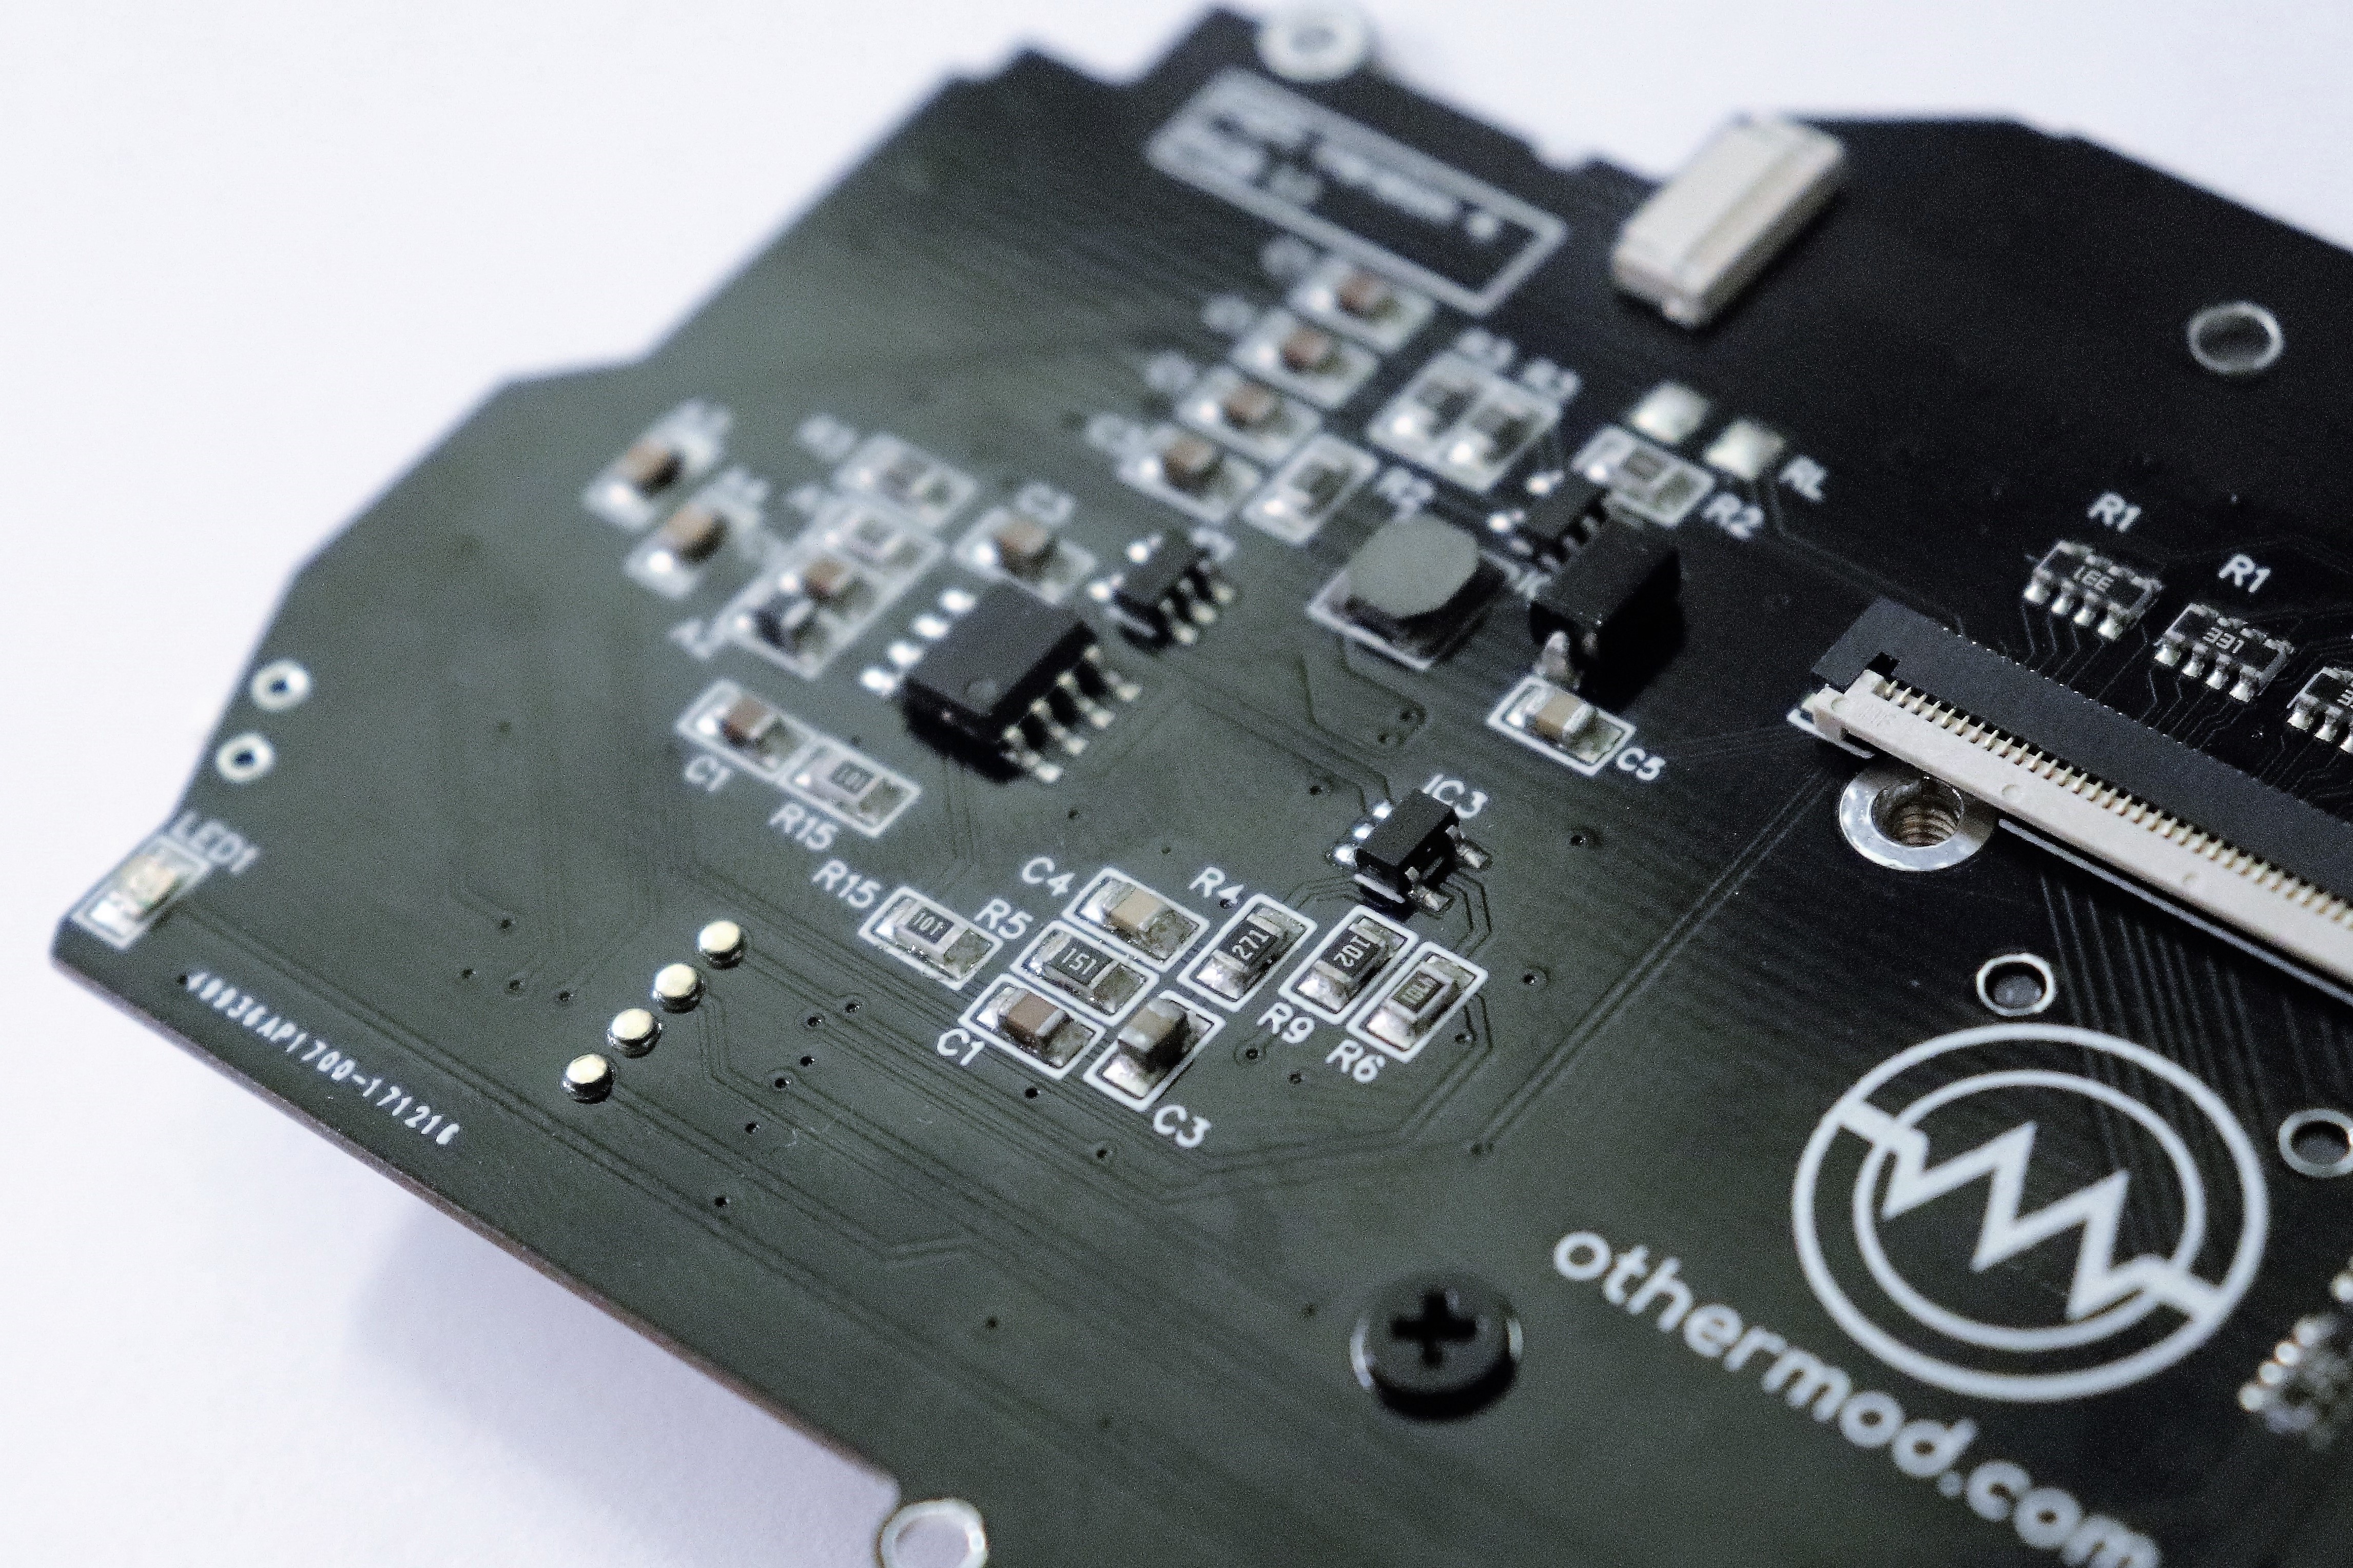
The board has a pre-installed header for easy soldering of the Pi Zero. It also has gold-plated pogo pins for the SD card and USB port, removing the need to solder those features.
The CSI connector is used for communication with the onboard ICs, and a cable is included with each kit.

Speaker connectors
Speaker wires will attach using 1.0mm JST connectors. The wires will have to be soldered to the speakers initially, but connection and disconnection is easy once the new wires are soldered.
Increased efficiency
Integrating more features allows for lower power consumption and more control over what features are enabled and disabled
The removal of the external LCD controller removes much of the power consumption and heat generation.
LCD can be dimmed to lower power consumption

The audio can be switched off using the switch to lower power consumption. This will lower the power usage (a very, very small amount) and give a little extra play time.

2000mAh to 2500mAh batteries should give 3-6 hours of play time, depending on the emulator used and the LCD brightness. The board can run for almost 24 hours at the command prompt when the LCD is dimmed to the lowest level.
Boost converter is no longer part of the board, and this improves efficiency by 10-20%. The microUSB port at the top is powered directly from battery.
Better emergency shutdown circuits
Will kill power once battery is depleted (about 3.5v). This is a hard-wired feature that won’t require software to function. It serves as a backup in case the software features aren’t working for some reason. If the PSPi is powered on with depleted batteries, it will power off almost immediately.
Redrawn outline
More accurate hole positioning, which is needed for proper joystick alignment
Better USB port positioning
Additional indication LEDs
LED indication on the left side for SD card activity (or any other use for those that know how to code). A second LED is included in PCB 1.2 and above. The LEDs are connected to GPIO 10 and GPIO 20.

Better audio using a LDO-buffer-filter-amplifier setup
Improved audio filtering to get rid of more PWM noise. Very similar to the audio circuit in the Pi 2.
Speakers can be switched off using the switch on the left side (which will lower power consumption and give a little more play time)
Pressing the Home button will exit games in the same manner as pressing Start+Select
Misc Features
I2C pads to attach devices.
All of the PSP’s buttons work.
Volume buttons are able to adjust volume up and down.
Other Features of Version 4
The board will only have RetroPie compatibility at release, but Lakka is built on the same software and can be made compatible.
MicroSD port has been relocated to the bottom of the V4 board.
A connector has been added to the bottom of the board, and will help to add a headphone jack at a later time.
Ability to add a connector and use the original PSP’s battery. This is not a recommended addition since the PSP’s battery has a different operating voltage, but it is available for those that want it. I’ll include the connector and the end user can solder it into position, just let me know you want it included by adding a note to your order.
Solder pads on the bottom to add additional I2C modules. This allows you guys to add RTC modules, or even add additional inputs.
Software Progress
Check it out (and help improve it) on GitHub
The kit is no longer available for purchase. The design files are here.
I can’t wait to see your work!
First, thank you for creating this site and for offering your amazing kits. I’m relatively new to all of this but I am now inspired to begin building my own PSPi. Quick question regarding Pi3 compatibility – in theory, what would have to be done aside from de-soldering the USB and Ethernet ports? Thanks!
Probably much more than that. The Pi 3 just won’t fit, so there would be some serious plastic modification needed.
As far as function, it is pin-compatible with the Pi Zero, so electrically it would work on the PSPi Version 3. Version 4 is different entirely though, and I doubt it will be compatible with the Pi 3
hi
I’m using gpio to driver LCD,use DPI.
But it do not work.Can you help me?
here is my config.txt
# Disable spi and i2c, we need these pins.
dtparam=spi=off
dtparam=i2c_arm=off
# Set screen size and any overscan required
overscan_left=0
overscan_right=0
overscan_top=0
overscan_bottom=0
framebuffer_width=480
framebuffer_height=272
# enable the DPI display
enable_dpi_lcd=1
display_default_lcd=1
# set up the size to 480×272
dpi_group=2
dpi_mode=87
# uncomment for 480×272 display (Adafruit 4.3″)
dpi_output_format=520197
hdmi_timings=480 0 40 48 88 272 0 13 3 32 0 0 0 60 0 32000000 3
thanks!
it used DPI_OUTPUT_FORMAT_18BIT_666_CFG1
it is working now
The config.txt is all right.
the led pin disp must connect to vdd
Glad you got it working. Was just about to paste a copy of my config.txt (it’s nearly identical).
what about the psp 4.3 screen?
There is some problem,it can work,but it can not full screen.It displays in right part of screen.
I used the same config.txt.
Can you fix it?
Finally I found the LQ043T1DG03 datasheet.And it works now!Perfect !
Looks like you had to adjust the front/back porch
Awesome!!!
As for CM3, I definitely agree with you that this is something worth undertaking, even as a version 4.1 or 5. This makes it much easier to upgrade in the future to a CM4 for a power boost without the need rebuild everything from the ground up.
I personally think it’s worth remaining with the raspberry pi architecture vs trying something else. I personally tried the latest ASUS Tinker Board that is trying to compete with RPi. It does give a performance boost, but support for retropie is really bad. Even RPi started up as a fairly simple SBC and it really only picked up after a vast community was built around it. Just my two cents… 🙂
Think it would be great to see v4 use the original battery.
Added to the “Requested Features” list
Nice. Looking forward to all your future iterations.
Hoping to be able to xfer the work over to a 2000 or 3000 version. There are some pretty substantial barriers keeping me from building those right now though.
Could this be a good cheap fit for the speaker JST connector?
https://www.aliexpress.com/store/product/100-SETS-Mini-Micro-SH-1-0-2-Pin-JST-Connector-with-Wires-Cables/719331_32495133192.html?spm=2114.12010612.0.0.a5Xest
Not positive exactly what the height is on that one, but so far all the ones I’ve found have a little too much height (mostly 2.0mm and I need 1.7mm).
Nice news!
About the new LCD drive method, how many GPIOs are needed to control de LCD?
And the GPIOs remainig are enought for the complete keypad (Dpad, A, B, X, Y, L, R, Select, Start)
How solve this?
Thank you!
The LCD takes nearly all of them, leaving only a couple for buttons. I’ve had to get very creative using additional modules to add more GPIO pins.
This is where a design that includes the CM3 module in it makes a huge difference! With the CM3 module you get access to all the RPi GPIO connections and not just 40 of them as with other ones.
Obviously this is a day 2 solution for now as you mentioned.
One request though as for updates, if you could; hard to see what was updated vs previous update.
Thanks
Still am floored by how rapid these iterations are and how big your scope is. Can’t wait to give version 4 to my electrical engineer to solder up!!
Let me know if you need any collaboration on CM3 integration.
I’ve got a Compute Module adapter board for Gameboy Zero projects looking to upgrade from the Zero to Pi3 power.
http://www.sudomod.com/forum/viewtopic.php?f=9&t=3003
Loving the improvements! Backlight control is essential for squeezing out extra battery life.
Regarding the driver, you can write a continuous polling script in python (probably the easiest if the driver itself is in python). You will just have to make it into a service, which you can then enable when the system starts.
As an example, I had written a python script which controls the backlight of a TFT which is attached to GPIO 18.
https://www.thingiverse.com/thing:2126383
I love it. It looks like the button does exactly what the PSP’s brightness button does. Something like this would definitely be easy to add to my existing python script that already runs to look for the shutdown button.
Quick thought to throw out there…
It seems like if you extend the bottom left side of your PCB you could actually have at least the MicroSD card in place for the side loading of it. If that’s true it will make it a lot easier instead of soldering and gluing the SD card.
Also, while at it, though there is a height difference, could there also be a way to have the audio jack directly soldered to the PCB, or potentially to a smaller PCB as part of the kit that attaches to the main PCB with an FFC flat cable?
All this would make for a very easy rip and replace kit!
I’ve been tinkering with different methods of doing exactly that. The 6 square vias on the left side are for the microSD. I’ve got a couple different sd slots I’m trying out, but alignment will be a problem. I’ll probably have to stack a smaller PCB on the underside of the main board so that the microSD slot is lines up with the plastics. As for the audio jack, I think I’m going to make an optional additional board that just pops into place or that is easy to solder. I wanted to be able to make this board hold the microSD slot too, but I doubt the height will be right unless I can find a upside-down microSD slot.
Awesome!!!
Worth adding these items to the above optional features?
Yeah. I’ll do it in the next update (shooting for weekly updates)
https://sites.google.com/site/fpgaandco/de0-nano-psp-screen
This can help you with psp lcd, just found while browsing.
Thanks for the link. I’ll check it out.
in the spots where there are no traces, you could take off material, making the board slightly lighter. this will also allow us to hide cables (if there are any) underneath the board
can you also try to make this compatible with the pi 3 model b. I’m fine with desoldering the thing, i just want a powerful board in my custom psp.
another idea i had was making the controller work over usb, this will (most likely) drastically save gpio headers, which can simplify the board. this can also make the software config far easier, as the controls will already be translated into something that lakka and retropie can understand. although the board will have to be programmed by either us, or the pcb manufacturer.
Most people do it this way, but I’m not a fan. That means adding a USB hub and ATMega, and then having to program each board manually. Too many things that can go wrong for the end user. I prefer special-purpose components because of the increased reliability. It’s causing the design portion to take longer, but I think it’s worth it.
Also, my plan with this board is to have zero wires. Some soldering of pins might or might not be needed, but there won’t be any wires.
Currently it isn’t compatible with a Pi 3, but it’s possible that something could change. There’s still lots of work ahead.
Would it be better to use a compute module since it is about the same size as the zero but much more powerful?
Gotta save something for V5.
The compute module would be better in many ways, but that means adding everything from this + WiFi and Bluetooth. Too much for one guy that does this in his off time. It’s possible it will happen, but it would be further down the road. I expect something with quad core that’s comparable to the Pi Zero will get released eventually, and when that happens I’ll be making a board for it.
I will buy this for sure! For the micro USB why not just use an extender? https://www.amazon.ca/48cm-Sd-micro-Card-Extender-Cable/dp/B007WYRO7O
I wanted to originally with V3, just couldn’t find one that worked in the available space. I don’t want to use it on this version because I’m trying to make it so that no glue is needed.
mate i have been following the project and it fantastic only comment i have it i have seen a orange pi zero 2 plus which is 4 core and may fit in a future project !
I saw it a few weeks ago and it looks very promising. I haven’t done any research to see how much community support it has and how good gaming performance is. I might be buying a couple for tests.
Good work. When do you plan to start the pre-order? 🙂
As soon as I am confident with the features I’ll be including. I’ve got at least one more prototype to build before I’m ready to make that call.
I agree that going with the 4.2v battery is the better choice. Even if you go out and buy and after market battery, which there are plenty of really nice extended battery options as well (example: https://www.amazon.com/Sony-PSP-1000G1-PSP-1000G1W-PSP-1000K-PSP-1000KCW/dp/B004WLOJ0A/ref=sr_1_10?ie=UTF8&qid=1502127792&sr=8-10&keywords=psp+3.7v+battery) it makes it easier to just replace a worn out battery with a new one.
Definetly go for the 4.2v and better capasity choice.. it is logic.
And batteries are cheap and easy to get a hold of.
Hi,
Hope I’m not treading on your trade secrets here, but how are you doing the on-board/GPIO LCD control? Is there any chance you will type up an instruction for it, or maybe share your own sources?
BTW, I would always prefer the 3.7V batteries for the additional capacity.
Cheers!
It uses publicly available (and very difficult to decipher) info from https://www.raspberrypi.org/documentation/hardware/raspberrypi/dpi/README.md
I 100% plan to make a tutorial, and maybe even design a small LCD board that sits on top of the Pi Zero. This is one of the best features the Pi has to offer and it’s not available to most people because of the difficulty setting it up. As most of you know though I’m in way over my head and won’t have time for a while.
Very glad to hear that! Screens is a main concern for me in my projects, at least when I cant fit an HDMI controller board.
Very nice work on the prototype 1 ! The screen quality looks great ! Thanks for the video 😉
have you managed to find away of using the original screen? i wanting to make one with the clear resolution of the original screen.
I got it working a while back, but there is a flicker in the screen I cannot get rid of. Tried everything I knew to try, but I think its due to the Pi having a fixed 9.6Mhz clock and the PSP’s LCD needing 9.0Mhz. It’s on the back burner for now.
I’m not missing it though. The LCD I’m using in place of it is glorious.
is the one you are using the one you sell on your website?
im wanting to learn how to design my own pcb any tips ?
Not exactly. The one I sell is meant to attach to the Pi’s composite pin, and is used for v3. The panel itself will probably be compatible with the v4, but it’s not the panel I’ll be using.
As far as tips for PCB design, I recommend starting with other people’s schematics and board designs to see what they have done. Pick something small, like one of the boards Adafruit sells. They give out the design files for free. You can view and edit them with Eagle, or just import them into an online editor like EasyEDA. Just do lots of research, read tons of datasheets, and watch YouTube videos. I don’t really have any specific links, but YouTube is full of good stuff.
Feel free to ask any questions here or on Discord
does the monitor you sell work with pi3?
It does
What will this v4 kit cost?
It’ll be pretty close to the last one, but I don’t have an exact number yet. They will cost me more to build, but the LCDs will be cheaper.
I check this post weekly with bated breath. I CAN NOT wait!
Check back tomorrow. Something exciting is scheduled for delivery today…
Will there ever be a tutorial for this version with the kit and everything you need?
There will. It will be similar to the V3 tutorial.
Hi, love the work your doing. have you thought about using the pi3 compute module? It provides far more processing power than the pi zero but in the same form factor. kite over at sudomods has just done one but for a gameboy shell. thought you could possibly do the same but your own version (obviously 🙂 )
http://www.sudomod.com/forum/viewtopic.php?f=38&t=4351
Woops! should of read more closely, it has already been suggested.
It has, but more people asking might cause me to focus a little more on it. Thank you for the suggestion.
Having already ordered the v4, unless the Zero W 2 is equal to the 3 or better, I’d be interested in buy a pi3 compute module edition board.
Thanks for letting me know. Many others have expressed the same interest.
Already have the version 3 and the version 4 is on order.
Looking forward to having a crisp display.
As mentioned before, the lack of compute module support is a little bit of a deal breaker for me due to low performance of RPI zero. I would really love to see that feature.
I did just buy v4… Well back ordered it. But I would also likely buy a pi3 compute version if it ever gets made.
It’ll be a bit of a wait, but I do intend to get back to PCB design once v4 orders settle down. Something quad- or octo-core would be great for the more demanding games.
Does it makes use of all GPIO pins?
If not, can you write me the free ones?
Thank you
It uses every single one. Two of them are used for LED indicators, and they could be stolen for other uses.
Hello.
What is the function of each led? I guess that one of them shows the activity, and the other one?
The bottom LED is GPIO10 and shows SD card activity (there’s an entry in config.txt making it do this). The other (which is on GPIO20 and was added on PCB 1.2) doesn’t do anything, it’s there in case someone wants to use it.
Ok. Thank you.
I asked it because I have the v1.2, but haven’t tested yet. Next weekend… ^^
If I were to get 2 of the turnigy batteries and solder the wires together would I need something like a BMS to make sure the batteries stay at the same charge or would it not work at all?
You can wire them in parallel. You just need to make sure both batteries are at the same charge level before connecting them together.
You’re gonna have a hard time fitting two of those into the case.
Hallo. Ich habe noch ein paar PSP der 3000er Serie. Würde es bei ihnen auch funktionieren oder nur bei der 1000er Serie?
MfG Jan
Hallo. Ich habe noch ein paar PSP der 3000er Serie. Würde es bei ihnen auch funktionieren oder nur bei der 1000er Serie?
MfG Jan
Hello. I still have a few PSP of the 3000 series. Would it work with them or only in the 1000 series?
MfG Jan
Nur die 1000er Serie ist kompatibel
Only the 1000 series is compatible
Hello,
Is there any additional configuration required for Zero W?
Can’t boot so far, system going down after ~3sec (same result with/without sdcard/power)
No, nothing extra for the Zero W.
Make sure you copied all the github files to the folders on the SD card, and merged with the files already on the SD card
Try the microSD card directly in the Pi Zero, instead of on the PSPi board.
Hi, thanks for advises,
After disassembling, and inserting SD card directly (with clean retropie + pspi4, git clone and copy over to boot partition on the card), board start (LED1 blinks for some time and LCD backlighted with white color)
So I assume that problem with external SD card slot is with pogo pins, I will try to check them.
But unfortunately I don’t see any progress after that “white screen” stage even after ~10min it remains the same.
Please advise.
Greatly appreciate your work and help.
The SD card issue could definitely be a pogo pin.
The white screen is something different entirely though, and can only be caused by one of a couple things:
The LCD overlay file wasn’t copied to the /boot/overlays folder
Some of the 40-pin header pins weren’t soldered fully.
The LCD cable isn’t fully inserted into the 40-pin FPC connector.
If you post some pics in the forum or Discord I’m happy to take a look
I received an alert that v4 stock was available at 8am this morning only to see they all sold out within one day? Is that right? Geez..
They sold out within two or three hours. This was the first time they’ve officially been put into stock, so that was unavoidable. The next batch should be in stock longer.
I was lucky enough to order one! Thanks for your work!
About the pi3, I don’t know if anyone’s mentioned this yet but Freeplay managed to fit the pi3 by using, Raspberry Pi Compute Module 3 Lite. Maybe worth looking into. Thanks again!
Oh sorry, I forgot to mention that they fit it in a gameboy advance!
Please on your next revision please use the compute module 3 not the lite so much better then the pi0
Hi guys!
Everything is working great, except i am having some audio issues:
The left audio channel is dead silent, the right one is broadcasting to both speakers/headphone-sides.
I tested this with aplay and a testing .wav.
Did i fail the soldering or this a known software issue? Any tips before i start ripping up everything?
Thanks!
I don’t think you failed anywhere. The audio coming from the Pi is mono, from GPIO 18 (only so many GPIOs available, so had to go mono). The mono audio then goes to both speakers. If you’re having trouble with output and want the channels blended, there are complicated software ways to do it, but so far I haven’t played any games that needed both channels.
One thing i am really worried about, a lot of people online are saying that the zero doesnt run gba or snes well or many other emulators very well, and i really dont want to spend 200$ on something that will only run 3 or 4 emulators? What is your experience? Have you tested many retro pie emulators and which ones run well in your opinion? I would really appreciate your help because i am so excited for this project but i dont want to get it now if i should wait a while for an updated model that will work for what i need
The Zero runs tons of games just fine, anything GBA and earlier does fine for me, and it just depends on what you want to play. I recommend getting a Zero and hooking it up to a TV using HDMI. Test it out before making the big purchase, since my board is just interfacing with the Pi.
Hello! I would like to use the original battery from the memory bandwidth, why is this not recommended? The battery says 3.7 volts.
It looks like autocorrect or a translator didn’t work for you, but I think I understand what you’re asking. The original PSP battery is 3.6v, not 3.7v. Aftermarket 3.7v batteries should work fine if you want to install the PSP battery connector.
Will the 3.6 V battery not work?
It will not work
Sorry, but I didn’t catch the price for one kit?
Love the idea of doing this to a psp. Have seen something similar with a gba also. The gba one had a version using the compute module to give it some more power. Have you looked at making a more beefy version?
I will probably do something with the compute module in the future, once the demand for v4 slows a bit.
I see the update from 9/3, are all of those already spoken for? Just stumbled on the site and would love to buy the kit. Awesome work!
Did you ever consider a swap for another type USB connector up top?
More will be ready very soon. Trying to ship a batch every 1-2 weeks until the end of the year.
It still uses the miniUSB on top.
hello
I have PSP 3000 and I am unable to replicate what u did with the PSP 1000 with the PSP 3000.
Can u try a version with the PSP 3000 pls, I would really appreciate it if u would do it or suggest
another tutorial.
Thank You
Interested to find out if the new Raspberry Pi 3A+ will fit in place of the Pi Zero. The A+ dimensions: 67×56×11.5 mm. This would give the PSPi V.4 a bit more versatility.
Can some give me a list of parts besides the ver 4 board and headphone jack I have ordered those 2 parts already and I have a psp 1000 to use. Is there a person that has a list of what’s needed and where to order them from.
How does the battery charge? Can it charge from the Mini USB port or can it only charge through the PSP proprietary charging port?
It only charges through the PSP charging port.
Are you going to sell the V4 as a Kit again or are you working on a V5?
I won’t be shipping v4 kits anymore. I’m working on new projects, one of which is an improvement on v4 (possibly will be called v5 if there are enough changes). I don’t plan to ship those boards though, and everything will be freely released so anyone can produce them from the design files.
Buy the the PCB ?
Hi!
Hey, man. How did you connect the joystick to the pcb?
Pingback: PSPi Compute – PSPi 1000 Version 5 – othermod