
Raspberry Pi Zero GPIO Control Buttons
This guide was rewritten on 3/7/17
Overview
The Raspberry Pi Zero at $5 is a perfect starting point for many projects. We need a way to interface with it though, and it doesn’t make much sense to double or triple that cost with a USB controller. There is a better way using GPIO controls and Adafruit’s Retrogame.
A complete guide was posted on Adafruit.com and shows the installation process, and they’ve even updated the process to include a more automated installation. This guide was created to simplify the installation and configuration process (especially when the Pi isn’t connected to the internet).
Part 1 of 2: Hardware
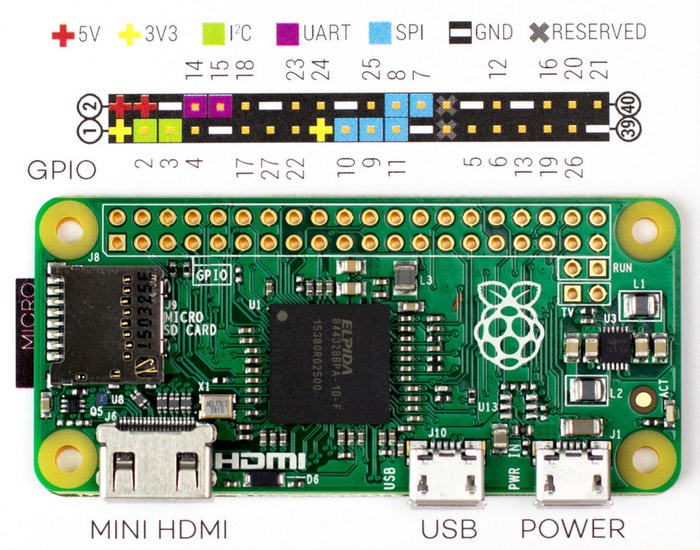
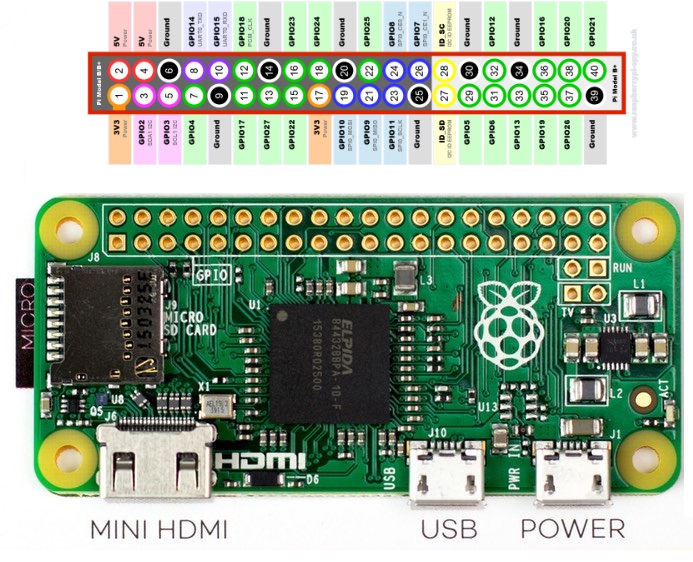 The Raspberry Pi has GPIO pins (the ones colored green in the image to the left), and these pins have many features.
Adafruit’s Retrogame enables one of these features, the pull-up resistors, to detect when a button is pressed and then send a keyboard press to the operating system. When the pull-up resistor is enabled by Retrogame, the assigned pin connects to 3.3v through a small resistor. If you were to put a voltmeter on the pin after configuring Retrogame to use it, it would show about 3.3v.[spacer height=”1px”]
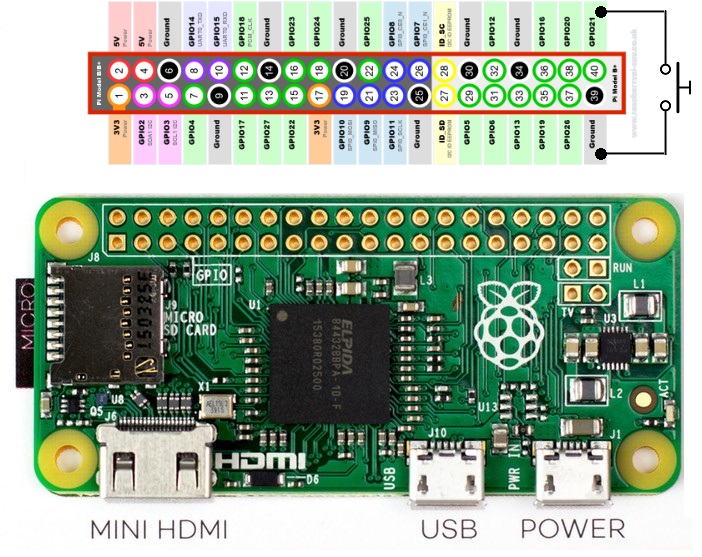
Here is how a button gets attached to a pin. The pin is normally sitting at 3.3v, and Retrogame is looking for a sudden voltage drop on the pin. The button makes this happen. One side of the button gets attached to the GPIO pin, and the other gets attached to a ground on the Pi. This can be any ground, and multiple switches can be connected to the same ground.
Let’s say we have Retrogame configured to look at GPIO pin 21, and this pin is configured to issue the key ENTER when the button is pressed. Pressing the button connects the pin directly to ground. Since the pin is only pulled up using a small resistor, this resistor is easily overwhelmed by the direct ground connection and the voltage on the pin drops suddenly. Retrogame detects this drop and knows to send the ENTER key to the OS.
Since RetroPie can use keyboard keys to control games, the Retrogame keypresses can be used in Retropie.
This process works in all software, not just RetroPie. The typical use is for gaming though, so that’s the focus of the tutorial.
Part 2 of 2: Software
Before you do anything else, start by downloading and installing Notepad++. You will need it to edit the config files if you want to customize the buttons.
Download the modified Retrogame zip file here and extract it to a folder. Insert your microSD card (with RetroPie or whatever OS you’re using already installed) into your computer.

Once extracted, you’re going to see a file (called setupcontrols.bash) and a folder (called otherMod)
Copy both of them.
[spacer height=”1px”]
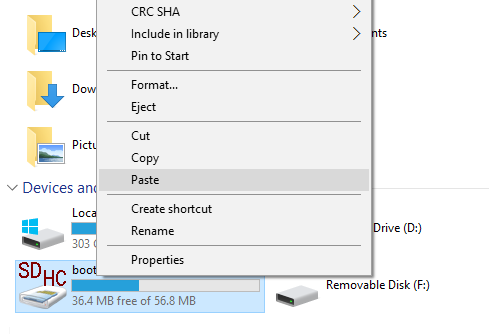
Now paste them into the boot drive that appeared when you inserted the microSD card into your computer.
[spacer height=”1px”]
Now, remove the microSD and insert it into the Raspberry Pi. Boot the Pi into RetroPie or other OS of your choice. If you’re using RetroPie, press F4 on your attached keyboard to exit into the command line.
Now the software need to be installed. To do that, you need to type one command:
sudo bash /boot/setupcontrols.bash
Follow the prompts to install. The last step asks whether you want to reboot, hit Y and enter to make it happen. If you are using this on the PSPi 1000 Version 3, then this is all you need to do. RetroPie will ask you to configure the buttons (if you already configured the buttons, use a keyboard to start the process again). You’re done.
If you’re using this for your own custom build, then there are a few more steps. You need to specify the GPIO buttons and the keyboard commands that get issued. It’s time to shut down the OS and put the microSD card back into your computer.
 Once the microSD is back in the computer, open the drive Boot and find retropie.cfg
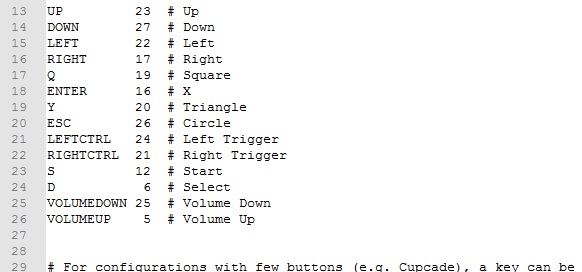
Open this file with Notepad++ and you’ll be greeted with this. Line 13 through 26 are all the custom commands I’ve added to the PSPi configuration. This can be modified to suit your needs though, and it’s not too difficult.
There are three columns. The first column is the keyboard command that gets issued, the second column is the GPIO pin that the button is attached to, and the third column is a short description of the command getting issued. The third column can say anything you want it to say, since it’s only there to assist us with a description.
If you have the same basic buttons, and they are attached to different GPIO pins, then just edit the GPIO pin numbers in this config file to match your project. You can also delete lines that aren’t needed or add new ones for additional buttons.
Once you’re finished just save the file and you’re done. The configuration file you edited will get read by Retrogame when you boot the Pi.
Questions? Comments? Leave a reply.
which verson of retropie are you using?
And can u share adafruit library that you used?
The new adafruit retrogamemaster.zip is different. Can you tell if the procedure is the same above?
I’m looking into it now. I’ll post an update in a couple days.
I’m running the newest version of RetroPie.
Do you have to do the RetroPie controller configuration thing that it automatically makes you do the first time you use RetroPie?
Yes. That still has to be done the first time RetroPie is opened.
Nice update. Thank you.
Are the volume buttons working yet?
The reason I ask is your config uses gpio pin 25 for volume down, but this is a ground pin. Is this right?
Pin 25 is a ground, GPIO 25 is Pin 22. The software uses GPIO pin numbering, not physical pin numbering.
The volume buttons are fully wired (I assume you’re talking about the v3 board), and just need to be configured to work. There’s some editing needed in retroarch to enable them if I remember correctly. I might make a small guide or post some details about volume control once I can get caught up on these orders.
Ah I see, thanks for clearing that up. I was not sure if my eBay spares or repairs Psp had faulty buttons. My version 3 board is working well, thank you for all your good work.
Is it possible to connect a joystick with this script using additional GPIO ´S?
Thanks for your amazing job!
If you’re using an LM339 you can, but it’s not the most ideal solution. GPIOs don’t have analog input, so an external chip is always needed for that.
Pingback: MMDVM portátil, autónomo y modular: HotSpot vitaminado. – EA7KKK
Pingback: Raspberry Pi Zero GPIO Control Buttons (2017) - My Blog